Showing posts with label .NET Programming. Show all posts

Tuesday, April 5, 2016

Windows Form - Using user controls

To separate UI with minimize coding effort, solve smaller problem or reuse purpose, we usually use sub-form or user control. In this topic, I will introduce how to call multi User Controls from parent form. With this idea you can make design UI for many kind of simple apps to enterprise apps. Let's get started:
      1.     Create new project:
-          Create new project by select: File > New > Project…
-          Enter the project name and click OK
      2.       Add controls
-          In Toolbox, find MenuStrip control, then add to form.
-          Enter some StripMenuItem, look like:


-          Rename all StripMenuItem like: smiControl01, smiControl02, smiControl03
-          Then, in Toolbox, find Panel control, add to form. Set this panel Dock property is Fill or do like this:

-          I named this panel is pnlMain
      4.       Add UserControls
-          In Solution Explorer, right click on project name, select Add > New Item…
-          Select User Control, named it and click Add

-          Do the same for 3 User Controls
       5.       Show/Add UserControls to form
-          Now, let’s do some coding. In the backend code of the form, create add user control to panel function
private void AddUserControlToPanel(Control ctrl)
{
    //Clear all old control
    pnlMain.Controls.Clear();
    //Add the new control
    pnlMain.Controls.Add(ctrl);
    //Make control fill in the panel
    ctrl.Dock = DockStyle.Fill;
}
-          In each click event of StripMenuItem, call that function with parameter is the relevant control
private void smiControl01_Click(object sender, EventArgs e)
{
    AddUserControlToPanel(new MyControl01());
}
private void smiControl02_Click(object sender, EventArgs e)
{
    AddUserControlToPanel(new MyControl02());
}
private void smiControl03_Click(object sender, EventArgs e)
{
    AddUserControlToPanel(new MyControl03());
}
-          You can also can call a default control when load form by call function AddUserControlToPanel in form constructor
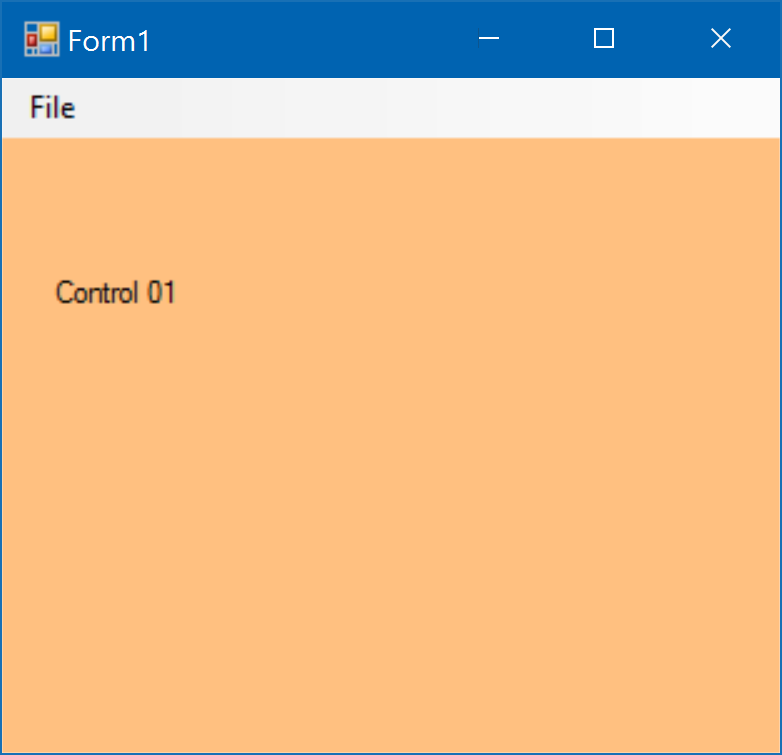
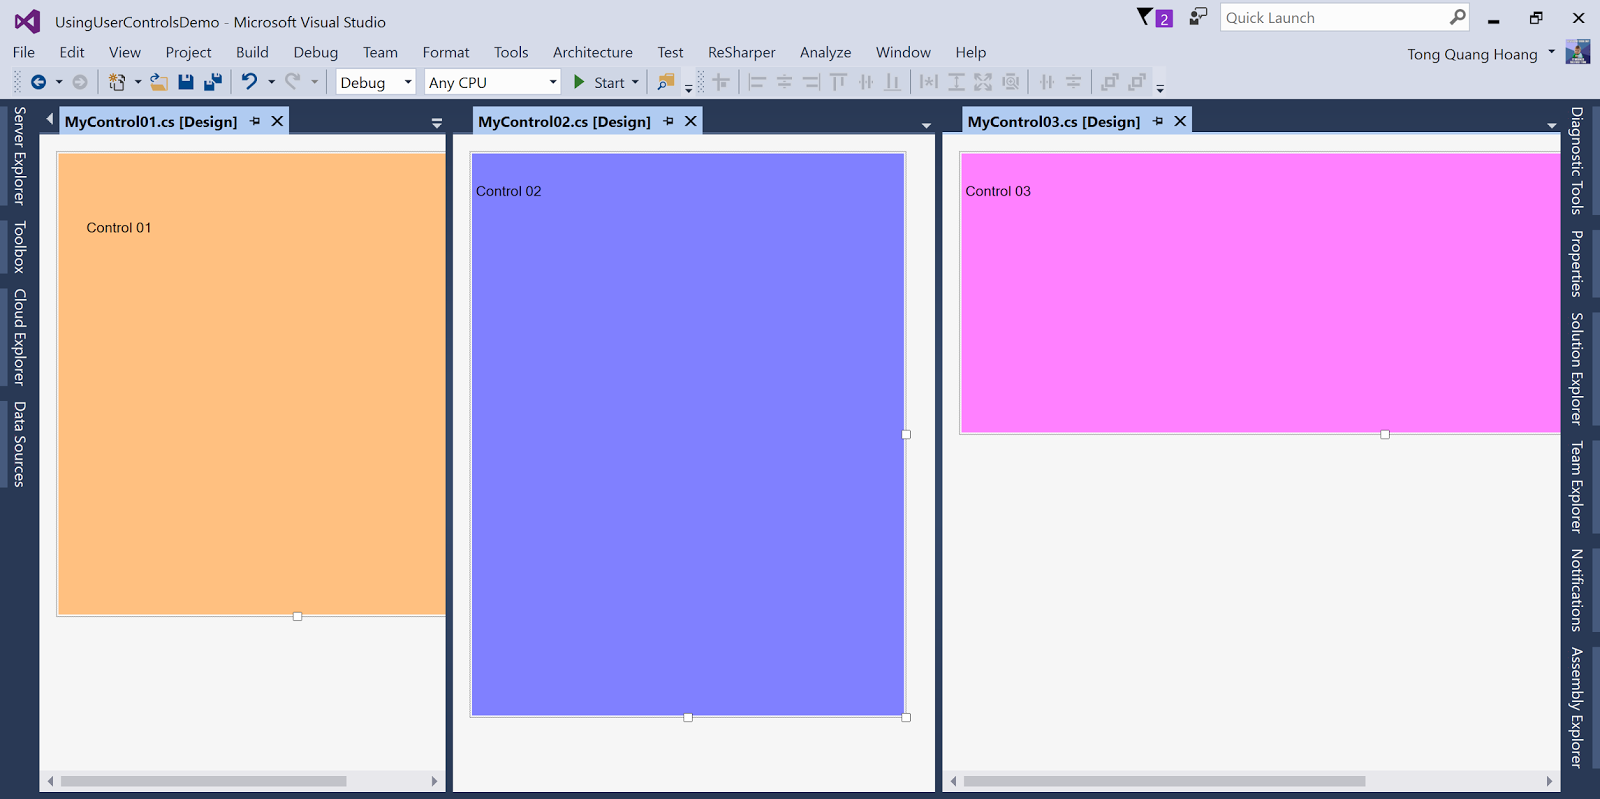
-          Note that, each user control can treat like a form, so you should do some design user controls before run check our result.
  

      6.       Resize form
-          You may wanna change the size of form when control added to make User Control appear fully
-          Edit the AddUserControlToPanel function
private void AddUserControlToPanel(Control ctrl)
{
    //Clear all old control
    pnlMain.Controls.Clear();
    //Add the new control
    pnlMain.Controls.Add(ctrl);
    //Make control fill in the panel
    //ctrl.Dock = DockStyle.Fill;
    //Change size form
    this.ClientSize = new Size(ctrl.Width, ctrl.Height + menuStrip1.Height);
}
-          Make controls are different size and color then run project 

Thank you for reading.

Wednesday, March 30, 2016

Xamarin.Forms validation using Behaviors

I''m starting with Xamarin not long time ago. Facing with validation problem, I found very useful class Behaviors. It's not all about validation but also can do more cool things with this class. In this post, I will focus on my way to use it in validation for client side.

The first thing, maybe you should look at this post:
https://blog.xamarin.com/behaviors-in-xamarin-forms/

Base on this, I do some changing code.
 - In the real thing, you may like to validate many condition for one controls (such as: Require and email format, require and maxlength...). To make it easier I create validation class to validate for each control type, instead of each rule. Let's see the code is changed:


   1:  
   3:  using Xamarin.Forms;
   4:   
   5:  namespace MyProject.Client.Framework.Validators
   6:  {
   7:      public class EntryValidatorBehavior : Behavior<Entry>
   8:      {
   9:          #region Properties
  10:   
  11:          //Result Boolean
  12:          private static readonly BindablePropertyKey IsValidPropertyKey = BindableProperty.CreateReadOnly("IsValid",
  13:              typeof(bool), typeof(EntryValidatorBehavior), false);
  14:   
  15:          public static readonly BindableProperty IsValidProperty = IsValidPropertyKey.BindableProperty;
  16:   
  17:          public bool IsValid
  18:          {
  19:              get { return (bool)GetValue(IsValidProperty); }
  20:              private set { SetValue(IsValidPropertyKey, value); }
  21:          }
  22:   
  23:          //Result message
  24:          public static readonly BindableProperty MessageProperty = BindableProperty.Create("Message",
  25:              typeof(string), typeof(EntryValidatorBehavior), string.Empty);
  26:   
  27:          public string Message
  28:          {
  29:              get { return (string)GetValue(MessageProperty); }
  30:              private set { SetValue(MessageProperty, value); }
  31:          }
  32:   
  33:          //Is check empty
  34:          public static BindableProperty IsCheckEmptyProperty = BindableProperty.Create("IsCheckEmpty",
  35:              typeof(bool), typeof(EntryValidatorBehavior), false);
  36:   
  37:          public bool IsCheckEmpty
  38:          {
  39:              get { return (bool)GetValue(IsCheckEmptyProperty); }
  40:              set { SetValue(IsCheckEmptyProperty, value); }
  41:          }
  42:   
  43:          //Is check email
  44:          public static BindableProperty IsCheckEmailProperty = BindableProperty.Create("IsCheckEmail",
  45:              typeof(bool), typeof(EntryValidatorBehavior), false);
  46:   
  47:          public bool IsCheckEmail
  48:          {
  49:              get { return (bool)GetValue(IsCheckEmailProperty); }
  50:              set { SetValue(IsCheckEmailProperty, value); }
  51:          }
  52:   
  53:          #endregion Properties
  54:   
  55:          protected override void OnAttachedTo(Entry bindable)
  56:          {
  57:              bindable.TextChanged += HandleTextChanged;
  58:          }
  59:   
  60:          private void HandleTextChanged(object sender, TextChangedEventArgs e)
  61:          {
  62:              if (IsCheckEmpty)
  63:              {
  64:                  IsValid = ValidatorsFactory.IsValidEmpty(e.NewTextValue);
  65:                  Message = Messages.FieldCannotBlank;
  66:                  if (!IsValid)
  67:                  {
  68:                      ((Entry)sender).TextColor = Color.Red;
  69:                      return;
  70:                  }
  71:              }
  72:              if (IsCheckEmail)
  73:              {
  74:                  IsValid = ValidatorsFactory.IsValidEmail(e.NewTextValue);
  75:                  Message = Messages.EmailIncorrectFormat;
  76:                  if (!IsValid)
  77:                  {
  78:                      ((Entry)sender).TextColor = Color.Red;
  79:                      return;
  80:                  }
  81:              }
  82:              //TODO: add more validation
  83:   
  84:              //Default
  85:              IsValid = true;
  86:              Message = string.Empty;
  87:              ((Entry)sender).TextColor = AppColors.EntryTextColor;
  88:          }
  89:   
  90:          protected override void OnDetachingFrom(Entry bindable)
  91:          {
  92:              bindable.TextChanged -= HandleTextChanged;
  93:          }
  94:      }
  95:  }

 * Note: It's contain some constants and reference to my source code so if you just copy&paste, it will not work, let's try to understand it.

Some thing changed here:
 - The first thing I add Message property to provide different validate message of each error for client to display. You see I set value for the Message in HandleTextChanged method.
 - Each kind of validate will have an option to validate it or not. In my code you will see: IsCheckEmpty, IsCheckEmail that you can control what you wanna validate for Entry or not.
 - The HandleTextChanged method ( or handle another event) will do validate and set value for IsValid and Message. You may wonder what is ValidatorsFactory, that the logic of validate I moved to other class call ValidatorsFactory.

Let's see how that factory work:


   1:  using System;
   2:  using System.Text.RegularExpressions;
   3:   
   4:  namespace MyProject.Client.Framework.Validators
   5:  {
   6:      public static class ValidatorsFactory
   7:      {
   8:          private const string EmailRegex =
   9:              @"^(?("")("".+?(?<!\\)""@)|(([0-9a-z]((\.(?!\.))|[-!#\$%&'\*\+/=\?\^`\{\}\|~\w])*)(?<=[0-9a-z])@))" +
  10:              @"(?(\[)(\[(\d{1,3}\.){3}\d{1,3}\])|(([0-9a-z][-\w]*[0-9a-z]*\.)+[a-z0-9][\-a-z0-9]{0,22}[a-z0-9]))$";
  11:   
  12:          public static bool IsValidEmail(string input)
  13:          {
  14:              return (Regex.IsMatch(input, EmailRegex, RegexOptions.IgnoreCase, TimeSpan.FromMilliseconds(250)));
  15:          }
  16:   
  17:          public static bool IsValidEmpty(string input)
  18:          {
  19:              return !string.IsNullOrWhiteSpace(input);
  20:          }
  21:   
  22:          public static bool IsValidMaxlength(string input, int maxlength)
  23:          {
  24:              return input.Length <= maxlength;
  25:          }
  26:   
  27:          //TODO: add more validation
  28:      }
  29:  }
That easy to understand, right? Those static methods will return the valid input or not.

Then, how to use. This example I used in sign-in page:


   1:   <controls:ExtendedEntry Grid.Row="0" Keyboard="Email" Text="{Binding Model.Email, Mode=OneWayToSource}" Placeholder="Email">
   2:          <Entry.Behaviors>
   3:            <validators:EntryValidatorBehavior IsCheckEmpty="True" IsCheckEmail="True" x:Name="EmailValidator"/>
   4:          </Entry.Behaviors>
   5:        </controls:ExtendedEntry>
   6:        <Label Grid.Row="1" TextColor="{x:Static styles:AppColors.LabelErrorTextColor}" 
   7:               Text="{Binding Source={x:Reference EmailValidator}, Path=Message}" 
   8:               VerticalOptions="Start" HorizontalOptions="Start"
   9:               IsVisible="{Binding Source={x:Reference EmailValidator}, Path=IsValid,Converter={StaticResource InvertBoolConverter}}"/>
Here is it:

Thank you for reading.

Edit: Please see the updated version here: http://blog.zquanghoangz.com/?p=139

Monday, May 14, 2012

Import/Export Excel and DataGridView


Today I write an example use MS Office Interop Excel to import and export Excel file and DataGridView. It's common with many results when you search on google.
But this class is very easy to use and study for beginner. I hope you enjoy it!

For the first, you need add reference Microsoft.Office.Interop.Excel
And use this class
   1:  using System;
   2:  using System.Reflection;
   3:  using System.Runtime.InteropServices;
   4:  using System.Windows.Forms;
   5:  using Microsoft.Office.Interop.Excel;
   6:  using Application = Microsoft.Office.Interop.Excel.Application;
   7:   
   8:  namespace ImportExcel
   9:  {
  10:      public static class ExcelUtils
  11:      {
  12:          public static bool ImportExcelOnRange(string filename, DataGridView view, string from, string to)
  13:          {
  14:              try
  15:              {
  16:                  var excelApp = new Application();
  17:                  Workbook workbook = excelApp.Workbooks.Open(
  18:                      filename, 0, true, 5, string.Empty, string.Empty, true, XlPlatform.xlWindows,
  19:                      "\t", false, false, 0, true, 1, 0);
  20:                  var worksheet = (Worksheet)workbook.Worksheets.Item[1];
  21:                  //var range = worksheet.UsedRange;
  22:                  Range range = worksheet.Range[from, to];
  23:   
  24:                  for (int row = 1; row <= range.Rows.Count; row++)
  25:                  {
  26:                      int newRow = view.Rows.Add();
  27:                      for (int col = 1; col <= range.Columns.Count; col++)
  28:                      {
  29:                          view[col - 1, newRow].Value = ((Range)range.Cells[row, col]).Value2;
  30:                      }
  31:                  }
  32:   
  33:                  workbook.Close(true, null, null);
  34:                  excelApp.Quit();
  35:   
  36:                  ReleaseObject(worksheet);
  37:                  ReleaseObject(workbook);
  38:                  ReleaseObject(excelApp);
  39:   
  40:                  return true;
  41:              }
  42:              catch
  43:              {
  44:                  return false;
  45:              }
  46:          }
  47:   
  48:          public static bool TranferExcelOnRange
  49:              (string filename, DataGridView view, string from, string to)
  50:          {
  51:              try
  52:              {
  53:                  Missing objOpt = Missing.Value;
  54:                  // Start a new workbook in Excel.
  55:                  var excelApp = new Application();
  56:                  var workbook = (_Workbook)(excelApp.Workbooks.Add(objOpt));
  57:                  var worksheet = (_Worksheet)(workbook.Worksheets.Item[1]);
  58:   
  59:                  var objData = new Object[view.Rows.Count, view.Columns.Count];
  60:                  for (int i = 0; i < view.Rows.Count; i++)
  61:                  {
  62:                      for (int j = 0; j < view.Columns.Count; j++)
  63:                      {
  64:                          objData[i, j] = view[j, i].Value;
  65:                      }
  66:                  }
  67:                  var objRange = worksheet.Range[from, objOpt];
  68:                  objRange = objRange.Resize[view.Rows.Count, view.Columns.Count];
  69:                  objRange.Value = objData;
  70:   
  71:                  // Save the Workbook and quit Excel.
  72:                  workbook.SaveAs(filename, objOpt, objOpt,
  73:                                 objOpt, objOpt, objOpt, XlSaveAsAccessMode.xlNoChange,
  74:                                 objOpt, objOpt, objOpt, objOpt);
  75:                  workbook.Close(false, objOpt, objOpt);
  76:                  excelApp.Quit();
  77:   
  78:                  ReleaseObject(worksheet);
  79:                  ReleaseObject(workbook);
  80:                  ReleaseObject(excelApp);
  81:   
  82:                  return false;
  83:              }
  84:              catch
  85:              {
  86:                  return false;
  87:              }
  88:          }
  89:   
  90:          private static void ReleaseObject(object obj)
  91:          {
  92:              try { Marshal.ReleaseComObject(obj); }
  93:              finally { GC.Collect(); }
  94:          }
  95:      }
  96:  }

 - "filename" is full path of excel file
 - "view" is DataGridView to import or export.
 - "from" and "to" is string address of Excel cell, for example: "A1", "C100"
Thanks,

Saturday, April 14, 2012

[C#] ExecuteNonQuery script to create database with GO word

You develop a business application, it use SQL server database. So before deliver you need to create setup package, it will auto run sql create database.
Then, you found ExecuteNonQuery statement to use to run sql script. But we have some issue in here. It can run only one sql statement in each times, I mean if you use GO, it will false to run. OK, here is a simple way to solve it.


   1:                  string script = File.ReadAllText(txtPath.Text);
   2:                  var conn = new SqlConnection(txtConnectionString.Text);
   3:                  var comm = new SqlCommand(string.Empty, conn);
   4:                  conn.Open();
   5:   
   6:                  string[] commands = script.Split(new[] {Environment.NewLine + "GO" + Environment.NewLine},
   7:                                                   StringSplitOptions.RemoveEmptyEntries);
   8:   
   9:                  foreach (var command in commands)
  10:                  {
  11:                      comm.CommandText = command;
  12:                      comm.ExecuteNonQuery();
  13:                  }
  14:   
  15:                  conn.Close();

In this sample code txtPath.Text is path to your sql script file. And txtConnectionString.Text store you connection string. OK, this is easy to understand.

Hope you enjoy!

Saturday, March 24, 2012

Reading PDF files

From codeguru forum, I find some articles about how to read/write PDF file. So, I found something here:
http://jadn.co.uk/w/ReadPdfUsingCsharp.htm
http://www.codeproject.com/Articles/5567/Create-and-manipulate-PDF-documents-100-NET

It's about free open sources and tutorials. You can find more articles in codeproject website.

Monday, March 12, 2012

[Csharp] Linq To XML first sample

Use .NET 3.5 or 4.0, you see a powerful LINQ. For study LINQ I have some links in MSDN are very useful.
 - Linq to Object
http://code.msdn.microsoft.com/101-LINQ-Samples-3fb9811b
 - Linq to XML
http://msdn.microsoft.com/en-us/vstudio/bb688087
 - And Linq to SQL
http://msdn.microsoft.com/en-us/vstudio/bb688085

Today, I write a first sample of me to use Linq to XML. I hope you enjoy it :)


   1:  namespace LinqToXmlSample
   2:  {
   3:      class Program
   4:      {
   5:          static void Main(string[] args)
   6:          {
   7:              const string myXml = 
   8:  @"<Root>
   9:      <ChildCollection>
  10:          <Child>Data1</Child>
  11:          <Child>Data2</Child>
  12:          <Child>Data3</Child>
  13:          <Child>Data4</Child>
  14:      </ChildCollection>
  15:  </Root>";
  16:   
  17:              XDocument document = XDocument.Parse(myXml);
  18:   
  19:              var children = from child in document.Element("Root").Element("ChildCollection").Descendants("Child") select  child;
  20:   
  21:              foreach (var child in children)
  22:              {
  23:                  Console.WriteLine(child.Value);
  24:              }
  25:   
  26:              Console.ReadKey();
  27:          }
  28:      }
  29:  }

I think it's very easy to understand.

Wednesday, February 29, 2012

[Csharp] Window Context Menu

Today, I read some topic on http://diendan.congdongcviet.com/
I found an enjoyable question on this topic: http://diendan.congdongcviet.com/showthread.php?t=85813
Create an custom menu in Window Context Menu, that I never thought. Get code of creator, I try to make menu.
After some minutes, I successfully create it. Then I have same question, how can get clicked file to my application. Try some ways and search Google. Yes, solution in here:
http://www.jfitz.com/tips/rclick_custom.html
Now, I will show you how to make a menu and do something with file.

For create new menu and remove it, I write a class:

   1:      public static class WindowContextMenu
   2:      {
   3:          public static void RemoveContextMenuItem(string extension, string menuName)
   4:          {
   5:              RegistryKey registryKey = Registry.ClassesRoot.OpenSubKey(extension);
   6:   
   7:              if (registryKey != null)
   8:              {
   9:                  string extstring = registryKey.GetValue("").ToString(); //root
  10:   
  11:                  registryKey.Close();
  12:   
  13:                  if (!string.IsNullOrEmpty(extstring))
  14:                  {
  15:                      registryKey = Registry.ClassesRoot.OpenSubKey(extstring, true);
  16:                      if (registryKey != null)
  17:                      {
  18:                          RegistryKey subky = registryKey.OpenSubKey("shell\\" + menuName);
  19:                          if ( subky != null )
  20:                          {
  21:                              subky.Close();
  22:                              registryKey.DeleteSubKeyTree("shell\\" + menuName);
  23:                              registryKey.Close();
  24:                          }
  25:                      }
  26:                  }
  27:              }
  28:          }
  29:   
  30:          public static void AddContextMenuItem(string extension, string menuName, string menuDescription, string menuCommand)
  31:          {
  32:              RegistryKey registryKey = Registry.ClassesRoot.OpenSubKey(extension);
  33:   
  34:              if (registryKey != null)
  35:              {
  36:                  string extstring = registryKey.GetValue("").ToString(); //root
  37:   
  38:                  registryKey.Close();
  39:   
  40:                  if (!string.IsNullOrEmpty(extstring))
  41:                  {
  42:                      registryKey = Registry.ClassesRoot.OpenSubKey(extstring, true);
  43:   
  44:                      if (registryKey != null)
  45:                      {
  46:                          string strkey = "shell\\" + menuName + "\\command";
  47:   
  48:                          RegistryKey subky = registryKey.CreateSubKey(strkey);
  49:   
  50:                          if (subky != null)
  51:                          {
  52:                              subky.SetValue("", menuCommand);
  53:                              subky.Close();
  54:                          }
  55:   
  56:                          subky = registryKey.OpenSubKey("shell\\" + menuName, true);
  57:                          if (subky != null)
  58:                          {
  59:                              subky.SetValue("", menuDescription);
  60:                              subky.Close();
  61:                          }
  62:                          registryKey.Close();
  63:                      }
  64:                  }
  65:              }
  66:          }
  67:      }
You can simply understand, it only write and delete key on Registry Editor. So, for use this class here is my sample:
   1:          private void btnRemove_Click(object sender, EventArgs e)
   2:          {
   3:              WindowContextMenu.RemoveContextMenuItem(".xls", "NewMenuOption");
   4:          }
   5:   
   6:          private void btnCreate_Click(object sender, EventArgs e)
   7:          {
   8:              WindowContextMenu.AddContextMenuItem(".xls", "NewMenuOption", "QuangHoang", Application.ExecutablePath + " \"%1\"");
   9:          }
This is code for two buttons Add and Remove.

So, now is the answer of question of topic I mention in top of post.

How your application open file? 
You can use args parameter. When user click on your menu, you can run you application and send file path to. Your application get the path and do what you want. Like this:
   1:          static void Main(string[] args)
   2:          {
   3:              Application.EnableVisualStyles();
   4:              Application.SetCompatibleTextRenderingDefault(false);
   5:   
   6:              if (args != null && args.Length > 0)
   7:              {
   8:                  Application.Run(new FormDemo(args[0]));
   9:              }
  10:              else Application.Run(new FormDemo());
  11:          }
Here, I am overload constructor of Main form.

How can get file's path user click on?
You can see on code I demo in above, you can see menuCommad parameter is Application.ExecutablePath + " \"%1\""
 - First part is path of you application, you can set what you want
 - Second part is "%1", it mean path of file you click on.

Source demo: http://www.mediafire.com/?qdg4ler3gt0guat
I think it so useful for some application.
Enjoy it :)

Monday, February 20, 2012

[Csharp] Tranfer data with two objects utility

Developing with an .NET business application, you will familiar with CRUD (it mean Create Read Update Delete).
So, Imagine you have a big object with more than 20 properties. Then you have an old object and a new object, how you can update for it? In normal way, we will set data for each property. So, new we have more than 20 object like this :)
A question, how we can write an function can update property data for T object?
Yes, we can. I found it. This post will you this function and how to use it on your project.
This function in this code snippet:

   1:      public static class Utils
   2:      {
   3:          public static void UpdateProperties<T>(T orginal, ref T dest, params string[] skips) where T : class
   4:          {
   5:              var destType = dest.GetType();
   6:              var destPropertyInfos = destType.GetProperties(BindingFlags.Public | BindingFlags.Instance | BindingFlags.DeclaredOnly);
   7:              var orginalType = orginal.GetType();
   8:              var orginalPropertyInfos = orginalType.GetProperties(BindingFlags.Public | BindingFlags.Instance | BindingFlags.DeclaredOnly);
   9:              foreach (var destInfo in destPropertyInfos)
  10:              {
  11:                  var propertyName = destInfo.Name;
  12:                  if (skips.Contains(propertyName)) continue;
  13:   
  14:                  var orgInfo = GetValue(propertyName, orginalPropertyInfos);
  15:                  destInfo.SetValue(dest, orgInfo.GetValue(orginal, null), null);
  16:              }
  17:          }
  18:   
  19:          private static PropertyInfo GetValue(string propertyName, IEnumerable<PropertyInfo> propertyInfos)
  20:          {
  21:              return propertyInfos.FirstOrDefault(info => info.Name == propertyName);
  22:          }
  23:      }

This functions will use type of object to get properties information, .NET support we can get and set value for a property. In loop, we will tranfer data from original object to destination object, but some properties you can skips tranfer, when you set names of them on skips parameter.

This is an demo to use it:
   1:          public class MyClass
   2:          {
   3:              public int Id { get; set; }
   4:              //with some properties
   5:          }
   6:   
   7:          static void Main()
   8:          {
   9:              // Original object with some new data
  10:              var fromObject = new MyClass();
  11:              // Destination object will be updated
  12:              var toObject = new MyClass();
  13:   
  14:              // Call update funtion
  15:              Utils.UpdateProperties(fromObject,ref toObject, null);
  16:              // Call update funtion with skip Id
  17:              Utils.UpdateProperties(fromObject, ref toObject, "Id");
  18:   
  19:              Console.ReadKey(true);
  20:          }

I have two objects of MyClass, I want to set data from fromObject to toObject. By call UpdateProperties function I can do it in short code.
It's really useful to me, so you are?
Thank to join it!

Thursday, February 16, 2012

[Csharp] Draw board game using GDI+


Beginning with .NET programming, you can develop some litle games. It will make you interest in study. In this post, I will show you how to use The Graphics Device Interface plus (GDI+) to draw some basic game boards.

1. O an Quan: 
It is an Vietnamese game, it's quite simple to draw. Here is code:

   1:          private void DrawMandarinSquareCapturingBoard(Graphics graphics, int width)
   2:          {
   3:              //Draw Ellipse
   4:              graphics.DrawPie(new Pen(Brushes.DarkTurquoise, 2), _startPoint.X, _startPoint.Y, width * 2, width * 2, 90, 180);
   5:              graphics.DrawPie(new Pen(Brushes.DarkTurquoise, 2), _startPoint.X + width * 5, _startPoint.Y, width * 2, width * 2, 270, 180);
   6:   
   7:              //Draw rows
   8:              for (var i = 0; i <= 2; i++)
   9:              {
  10:                  graphics.DrawLine(new Pen(Brushes.DarkTurquoise, 2), _startPoint.X + width, _startPoint.Y + i * width, _startPoint.X + 6 * width, _startPoint.Y + i * width);
  11:              }
  12:   
  13:              //Draw columns
  14:              for (var j = 1; j <= 6; j++)
  15:              {
  16:                  graphics.DrawLine(new Pen(Brushes.DarkTurquoise, 2), _startPoint.X + j * width, _startPoint.Y, _startPoint.X + j * width, _startPoint.Y + 2 * width);
  17:              }
  18:          }

For the first, we are draw two Pies in two sides.For each, it's a half of cycle. Next we are draw lines for columns and rows.

2. King Chess Board
This is a popular game. Its board is include black and white square. Here is code:
   1:          private void DrawChessBoard(Graphics graphics, int width)
   2:          {
   3:              //Draw bolder
   4:              graphics.DrawRectangle(new Pen(Brushes.DodgerBlue, 4), _startPoint.X, _startPoint.Y, 8 * width, 8 * width);
   5:   
   6:              bool isBlack = false;
   7:              //Draw elements
   8:              for (var i = 0; i < 8; i++)
   9:              {
  10:                  for (var j = 0; j < 8; j++)
  11:                  {
  12:                      graphics.FillRectangle(isBlack ? Brushes.White : Brushes.Black, _startPoint.X + i * width, _startPoint.Y + j * width, width, width);
  13:                      isBlack = !isBlack;
  14:                  }
  15:                  isBlack = !isBlack;
  16:              }
  17:          }

Firstly, we draw a bolder around the board. Then, draw all element in board. Color of element will follow _isBlack variable. It's changing everytime, when we fill rectangle.

3. China Chess Board
This game is popular in Vietnam, I know it come from China. I think this board quite to complex. Here is code:
   1:          private void DrawChinaChessoBoard(Graphics graphics, int width)
   2:          {
   3:              //Draw background
   4:              var linearBrush = new LinearGradientBrush(new Rectangle(_startPoint.X, _startPoint.Y, 8 * width, 9 * width), Color.Turquoise,
   5:                  Color.White, LinearGradientMode.BackwardDiagonal);
   6:              graphics.FillRectangle(linearBrush, _startPoint.X, _startPoint.Y, 8 * width, 9 * width);
   7:   
   8:              //Draw bolder
   9:              graphics.DrawRectangle(new Pen(Brushes.DarkTurquoise, 4), _startPoint.X, _startPoint.Y, 8 * width, 9 * width);
  10:   
  11:              //Draw rows
  12:              for (var i = 0; i <= 9; i++)
  13:              {
  14:                  graphics.DrawLine(new Pen(Brushes.DarkTurquoise, 2), _startPoint.X, _startPoint.Y + i * width, _startPoint.X + 8 * width, _startPoint.Y + i * width);
  15:              }
  16:   
  17:              //Draw columns
  18:              for (var j = 0; j <= 8; j++)
  19:              {
  20:                  graphics.DrawLine(new Pen(Brushes.DarkTurquoise, 2), _startPoint.X + j * width, _startPoint.Y, _startPoint.X + j * width, _startPoint.Y + 4 * width);
  21:                  graphics.DrawLine(new Pen(Brushes.DarkTurquoise, 2), _startPoint.X + j * width, _startPoint.Y + 5 * width, _startPoint.X + j * width, _startPoint.Y + 9 * width);
  22:              }
  23:   
  24:              //Draw king local
  25:              graphics.DrawLine(new Pen(Brushes.DarkTurquoise, 2), _startPoint.X + 3 * width, _startPoint.Y, _startPoint.X + 5 * width, _startPoint.Y + 2 * width);
  26:              graphics.DrawLine(new Pen(Brushes.DarkTurquoise, 2), _startPoint.X + 5 * width, _startPoint.Y, _startPoint.X + 3 * width, _startPoint.Y + 2 * width);
  27:              graphics.DrawLine(new Pen(Brushes.DarkTurquoise, 2), _startPoint.X + 3 * width, _startPoint.Y + 7 * width, _startPoint.X + 5 * width, _startPoint.Y + 9 * width);
  28:              graphics.DrawLine(new Pen(Brushes.DarkTurquoise, 2), _startPoint.X + 5 * width, _startPoint.Y + 7 * width, _startPoint.X + 3 * width, _startPoint.Y + 9 * width);
  29:   
  30:              //Draw plus
  31:              DrawPlus(graphics, _startPoint.X + width, _startPoint.Y + 2 * width, width);
  32:              DrawPlus(graphics, _startPoint.X + 7 * width, _startPoint.Y + 2 * width, width);
  33:              DrawPlus(graphics, _startPoint.X, _startPoint.Y + 3 * width, width);
  34:              DrawPlus(graphics, _startPoint.X + 2 * width, _startPoint.Y + 3 * width, width);
  35:              DrawPlus(graphics, _startPoint.X + 4 * width, _startPoint.Y + 3 * width, width);
  36:              DrawPlus(graphics, _startPoint.X + 6 * width, _startPoint.Y + 3 * width, width);
  37:              DrawPlus(graphics, _startPoint.X + 8 * width, _startPoint.Y + 3 * width, width);
  38:   
  39:              DrawPlus(graphics, _startPoint.X + width, _startPoint.Y + 7 * width, width);
  40:              DrawPlus(graphics, _startPoint.X + 7 * width, _startPoint.Y + 7 * width, width);
  41:              DrawPlus(graphics, _startPoint.X, _startPoint.Y + 6 * width, width);
  42:              DrawPlus(graphics, _startPoint.X + 2 * width, _startPoint.Y + 6 * width, width);
  43:              DrawPlus(graphics, _startPoint.X + 4 * width, _startPoint.Y + 6 * width, width);
  44:              DrawPlus(graphics, _startPoint.X + 6 * width, _startPoint.Y + 6 * width, width);
  45:              DrawPlus(graphics, _startPoint.X + 8 * width, _startPoint.Y + 6 * width, width);
  46:          }
  47:   
  48:          private static void DrawPlus(Graphics graphics, int x, int y, int width)
  49:          {
  50:              var w = width / 4;
  51:              var h = width / 10;
  52:              graphics.DrawLine(new Pen(Brushes.DarkTurquoise, 2), x - h, y - w, x - h, y - h);
  53:              graphics.DrawLine(new Pen(Brushes.DarkTurquoise, 2), x - w, y - h, x - h, y - h);
  54:   
  55:              graphics.DrawLine(new Pen(Brushes.DarkTurquoise, 2), x + h, y + w, x + h, y + h);
  56:              graphics.DrawLine(new Pen(Brushes.DarkTurquoise, 2), x + w, y + h, x + h, y + h);
  57:          }

It's about many lines with many point, you see it hard to know where is start and where is end of line. But this code is easy to understand. Read it carefully, you can get experience.

4. Caro Board
Yes, I know you know it. I am interest this game, I think this board not complex to you. Here is code:
   1:          private void DrawCaroBoard(Graphics graphics, int row, int col, int width)
   2:          {
   3:              //Draw background
   4:              var linearBrush = new LinearGradientBrush(new Rectangle(_startPoint.X, _startPoint.Y, col * width, row * width), Color.Turquoise,
   5:                  Color.White, LinearGradientMode.BackwardDiagonal);
   6:              graphics.FillRectangle(linearBrush, _startPoint.X, _startPoint.Y, col * width, row * width);
   7:   
   8:              //Draw rows
   9:              for (var i = 0; i <= row; i++)
  10:              {
  11:                  graphics.DrawLine(new Pen(Brushes.DarkTurquoise, 2), _startPoint.X, _startPoint.Y + i * width, _startPoint.X + col * width, _startPoint.Y + i * width);
  12:              }
  13:   
  14:              //Draw columns
  15:              for (var j = 0; j <= col; j++)
  16:              {
  17:                  graphics.DrawLine(new Pen(Brushes.DarkTurquoise, 2), _startPoint.X + j * width, _startPoint.Y, _startPoint.X + j * width, _startPoint.Y + row * width);
  18:              }
  19:          }

It have many parameters help you easy cho change size of board.

All game board show on screen when you implement them on Form Paint event and call invalidate() function wherever on form.
   1:      private void FormView_Paint(object sender, PaintEventArgs e)
   2:          {
   3:              switch (_choiceDraw)
   4:              {
   5:                  case 2: DrawChessBoard(e.Graphics, 50); break;
   6:                  case 3: DrawChinaChessoBoard(e.Graphics, 48); break;
   7:                  case 4: DrawLudoCirclesBoard(e.Graphics, 400); break;
   8:                  case 5: DrawCaroBoard(e.Graphics, 10, 10, 40); break;
   9:                  default: DrawMandarinSquareCapturingBoard(e.Graphics, 60); break;
  10:              }
  11:          }

It's all simple drawing game board, it hard to make a big or beautiful game. But If you choose right color, right size, you will make it better.
This is source code: http://www.mediafire.com/?ghad2nn1545ndhd
Hope you enjoy it :)