Tuesday, April 5, 2016

Windows Form - Using user controls

To separate UI with minimize coding effort, solve smaller problem or reuse purpose, we usually use sub-form or user control. In this topic, I will introduce how to call multi User Controls from parent form. With this idea you can make design UI for many kind of simple apps to enterprise apps. Let's get started:
      1.     Create new project:
-          Create new project by select: File > New > Project…
-          Enter the project name and click OK
      2.       Add controls
-          In Toolbox, find MenuStrip control, then add to form.
-          Enter some StripMenuItem, look like:


-          Rename all StripMenuItem like: smiControl01, smiControl02, smiControl03
-          Then, in Toolbox, find Panel control, add to form. Set this panel Dock property is Fill or do like this:

-          I named this panel is pnlMain
      4.       Add UserControls
-          In Solution Explorer, right click on project name, select Add > New Item…
-          Select User Control, named it and click Add

-          Do the same for 3 User Controls
       5.       Show/Add UserControls to form
-          Now, let’s do some coding. In the backend code of the form, create add user control to panel function
private void AddUserControlToPanel(Control ctrl)
{
    //Clear all old control
    pnlMain.Controls.Clear();
    //Add the new control
    pnlMain.Controls.Add(ctrl);
    //Make control fill in the panel
    ctrl.Dock = DockStyle.Fill;
}
-          In each click event of StripMenuItem, call that function with parameter is the relevant control
private void smiControl01_Click(object sender, EventArgs e)
{
    AddUserControlToPanel(new MyControl01());
}
private void smiControl02_Click(object sender, EventArgs e)
{
    AddUserControlToPanel(new MyControl02());
}
private void smiControl03_Click(object sender, EventArgs e)
{
    AddUserControlToPanel(new MyControl03());
}
-          You can also can call a default control when load form by call function AddUserControlToPanel in form constructor
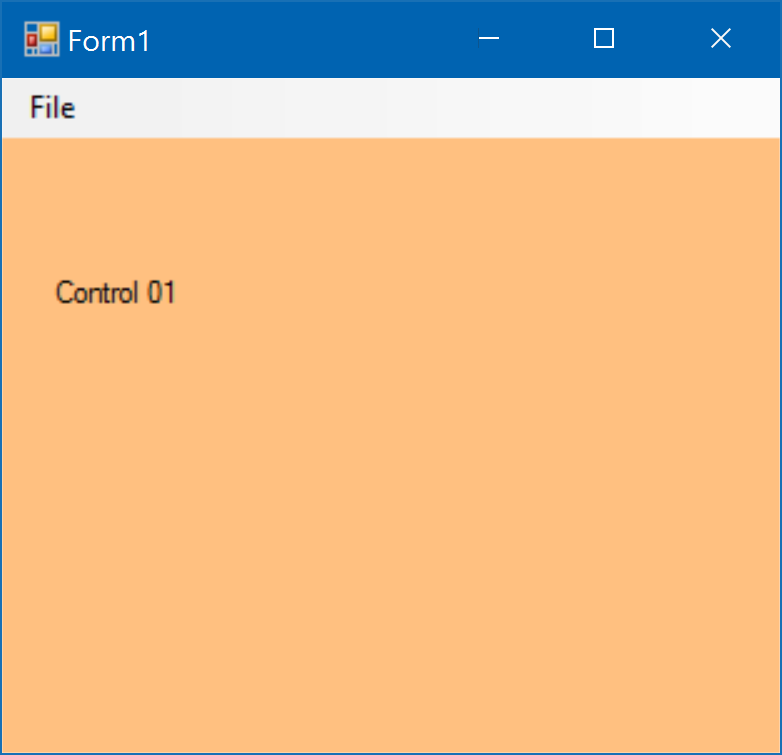
-          Note that, each user control can treat like a form, so you should do some design user controls before run check our result.
  

      6.       Resize form
-          You may wanna change the size of form when control added to make User Control appear fully
-          Edit the AddUserControlToPanel function
private void AddUserControlToPanel(Control ctrl)
{
    //Clear all old control
    pnlMain.Controls.Clear();
    //Add the new control
    pnlMain.Controls.Add(ctrl);
    //Make control fill in the panel
    //ctrl.Dock = DockStyle.Fill;
    //Change size form
    this.ClientSize = new Size(ctrl.Width, ctrl.Height + menuStrip1.Height);
}
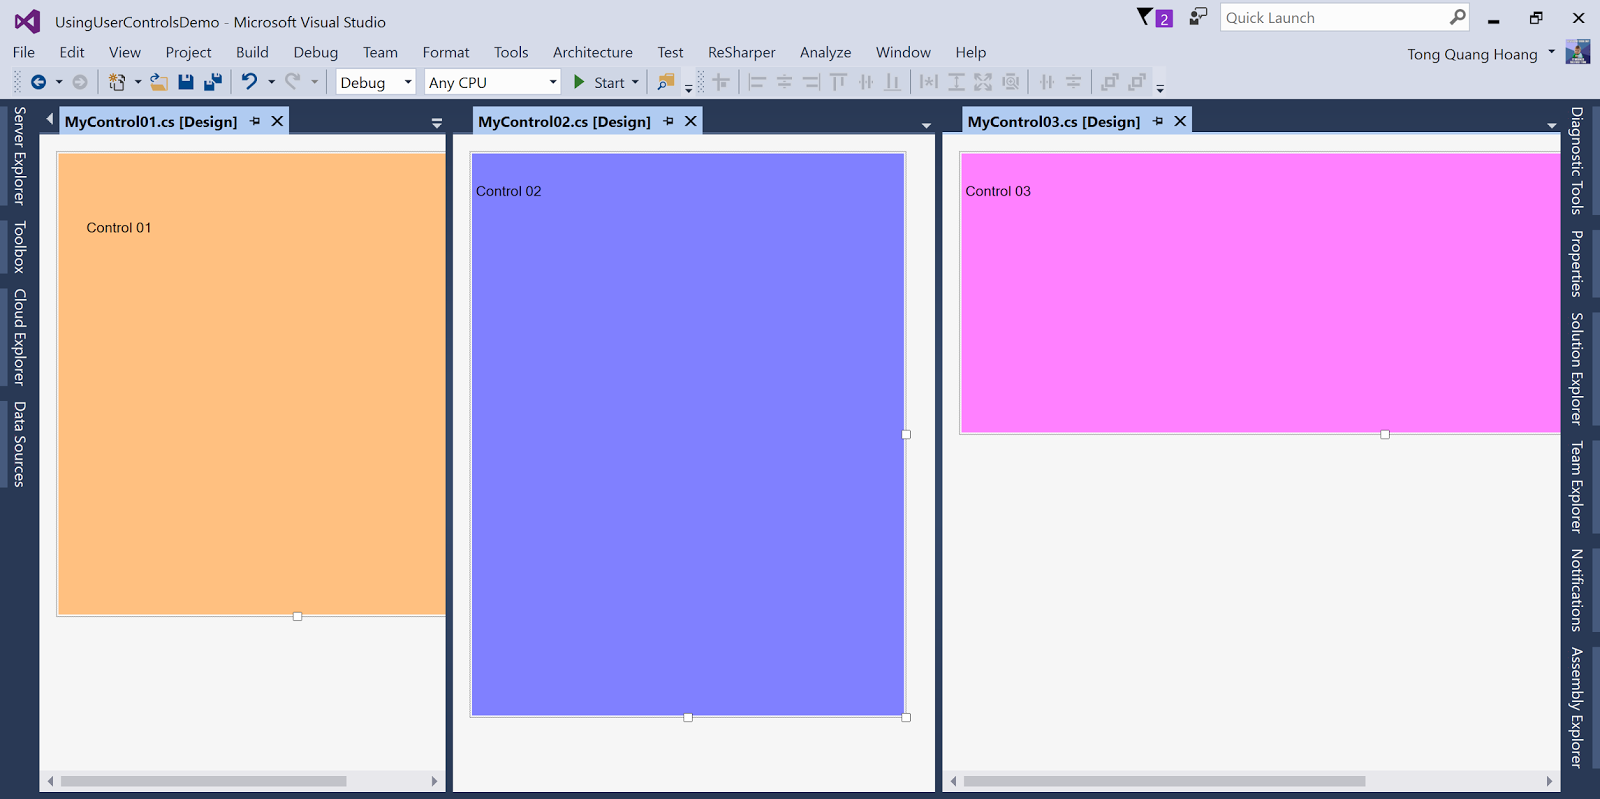
-          Make controls are different size and color then run project 

Thank you for reading.

Wednesday, March 30, 2016

Xamarin.Forms validation using Behaviors

I''m starting with Xamarin not long time ago. Facing with validation problem, I found very useful class Behaviors. It's not all about validation but also can do more cool things with this class. In this post, I will focus on my way to use it in validation for client side.

The first thing, maybe you should look at this post:
https://blog.xamarin.com/behaviors-in-xamarin-forms/

Base on this, I do some changing code.
 - In the real thing, you may like to validate many condition for one controls (such as: Require and email format, require and maxlength...). To make it easier I create validation class to validate for each control type, instead of each rule. Let's see the code is changed:


   1:  
   3:  using Xamarin.Forms;
   4:   
   5:  namespace MyProject.Client.Framework.Validators
   6:  {
   7:      public class EntryValidatorBehavior : Behavior<Entry>
   8:      {
   9:          #region Properties
  10:   
  11:          //Result Boolean
  12:          private static readonly BindablePropertyKey IsValidPropertyKey = BindableProperty.CreateReadOnly("IsValid",
  13:              typeof(bool), typeof(EntryValidatorBehavior), false);
  14:   
  15:          public static readonly BindableProperty IsValidProperty = IsValidPropertyKey.BindableProperty;
  16:   
  17:          public bool IsValid
  18:          {
  19:              get { return (bool)GetValue(IsValidProperty); }
  20:              private set { SetValue(IsValidPropertyKey, value); }
  21:          }
  22:   
  23:          //Result message
  24:          public static readonly BindableProperty MessageProperty = BindableProperty.Create("Message",
  25:              typeof(string), typeof(EntryValidatorBehavior), string.Empty);
  26:   
  27:          public string Message
  28:          {
  29:              get { return (string)GetValue(MessageProperty); }
  30:              private set { SetValue(MessageProperty, value); }
  31:          }
  32:   
  33:          //Is check empty
  34:          public static BindableProperty IsCheckEmptyProperty = BindableProperty.Create("IsCheckEmpty",
  35:              typeof(bool), typeof(EntryValidatorBehavior), false);
  36:   
  37:          public bool IsCheckEmpty
  38:          {
  39:              get { return (bool)GetValue(IsCheckEmptyProperty); }
  40:              set { SetValue(IsCheckEmptyProperty, value); }
  41:          }
  42:   
  43:          //Is check email
  44:          public static BindableProperty IsCheckEmailProperty = BindableProperty.Create("IsCheckEmail",
  45:              typeof(bool), typeof(EntryValidatorBehavior), false);
  46:   
  47:          public bool IsCheckEmail
  48:          {
  49:              get { return (bool)GetValue(IsCheckEmailProperty); }
  50:              set { SetValue(IsCheckEmailProperty, value); }
  51:          }
  52:   
  53:          #endregion Properties
  54:   
  55:          protected override void OnAttachedTo(Entry bindable)
  56:          {
  57:              bindable.TextChanged += HandleTextChanged;
  58:          }
  59:   
  60:          private void HandleTextChanged(object sender, TextChangedEventArgs e)
  61:          {
  62:              if (IsCheckEmpty)
  63:              {
  64:                  IsValid = ValidatorsFactory.IsValidEmpty(e.NewTextValue);
  65:                  Message = Messages.FieldCannotBlank;
  66:                  if (!IsValid)
  67:                  {
  68:                      ((Entry)sender).TextColor = Color.Red;
  69:                      return;
  70:                  }
  71:              }
  72:              if (IsCheckEmail)
  73:              {
  74:                  IsValid = ValidatorsFactory.IsValidEmail(e.NewTextValue);
  75:                  Message = Messages.EmailIncorrectFormat;
  76:                  if (!IsValid)
  77:                  {
  78:                      ((Entry)sender).TextColor = Color.Red;
  79:                      return;
  80:                  }
  81:              }
  82:              //TODO: add more validation
  83:   
  84:              //Default
  85:              IsValid = true;
  86:              Message = string.Empty;
  87:              ((Entry)sender).TextColor = AppColors.EntryTextColor;
  88:          }
  89:   
  90:          protected override void OnDetachingFrom(Entry bindable)
  91:          {
  92:              bindable.TextChanged -= HandleTextChanged;
  93:          }
  94:      }
  95:  }

 * Note: It's contain some constants and reference to my source code so if you just copy&paste, it will not work, let's try to understand it.

Some thing changed here:
 - The first thing I add Message property to provide different validate message of each error for client to display. You see I set value for the Message in HandleTextChanged method.
 - Each kind of validate will have an option to validate it or not. In my code you will see: IsCheckEmpty, IsCheckEmail that you can control what you wanna validate for Entry or not.
 - The HandleTextChanged method ( or handle another event) will do validate and set value for IsValid and Message. You may wonder what is ValidatorsFactory, that the logic of validate I moved to other class call ValidatorsFactory.

Let's see how that factory work:


   1:  using System;
   2:  using System.Text.RegularExpressions;
   3:   
   4:  namespace MyProject.Client.Framework.Validators
   5:  {
   6:      public static class ValidatorsFactory
   7:      {
   8:          private const string EmailRegex =
   9:              @"^(?("")("".+?(?<!\\)""@)|(([0-9a-z]((\.(?!\.))|[-!#\$%&'\*\+/=\?\^`\{\}\|~\w])*)(?<=[0-9a-z])@))" +
  10:              @"(?(\[)(\[(\d{1,3}\.){3}\d{1,3}\])|(([0-9a-z][-\w]*[0-9a-z]*\.)+[a-z0-9][\-a-z0-9]{0,22}[a-z0-9]))$";
  11:   
  12:          public static bool IsValidEmail(string input)
  13:          {
  14:              return (Regex.IsMatch(input, EmailRegex, RegexOptions.IgnoreCase, TimeSpan.FromMilliseconds(250)));
  15:          }
  16:   
  17:          public static bool IsValidEmpty(string input)
  18:          {
  19:              return !string.IsNullOrWhiteSpace(input);
  20:          }
  21:   
  22:          public static bool IsValidMaxlength(string input, int maxlength)
  23:          {
  24:              return input.Length <= maxlength;
  25:          }
  26:   
  27:          //TODO: add more validation
  28:      }
  29:  }
That easy to understand, right? Those static methods will return the valid input or not.

Then, how to use. This example I used in sign-in page:


   1:   <controls:ExtendedEntry Grid.Row="0" Keyboard="Email" Text="{Binding Model.Email, Mode=OneWayToSource}" Placeholder="Email">
   2:          <Entry.Behaviors>
   3:            <validators:EntryValidatorBehavior IsCheckEmpty="True" IsCheckEmail="True" x:Name="EmailValidator"/>
   4:          </Entry.Behaviors>
   5:        </controls:ExtendedEntry>
   6:        <Label Grid.Row="1" TextColor="{x:Static styles:AppColors.LabelErrorTextColor}" 
   7:               Text="{Binding Source={x:Reference EmailValidator}, Path=Message}" 
   8:               VerticalOptions="Start" HorizontalOptions="Start"
   9:               IsVisible="{Binding Source={x:Reference EmailValidator}, Path=IsValid,Converter={StaticResource InvertBoolConverter}}"/>
Here is it:

Thank you for reading.

Edit: Please see the updated version here: http://blog.zquanghoangz.com/?p=139

Sunday, January 24, 2016

Basic SharePoint 2013 tips & tricks collection - Part 1

I'm starting with SharePoint in end of 2015, then also want to write blog again, to collect all my work experience with SharePoint, probably with SharePoint 2013 this time.

I know all that tips tricks might be easy to find over the internet, but I will try to write them again with describe specific situation I meet. And will update time by time.

1. Change host-named for site collection in SharePoint 2013
That was painful lesson for me when I blow away all data of a site collection in production server (luckily it's not go live yet )
http://zquanghoangz.blogspot.sg/2016/01/change-host-named-for-site-collection.html

2. To login with different user
I don't know why, this thing is to hard in SharePoint, but in situation I run the UAT test, then should login with many accounts with different role. That is quick way to do:
http://<site URL>/_layouts/closeConnection.aspx?loginasanotheruser=true

3. Disable Loop Back Check in SharePoint 2013
It's not really SharePoint issue, that is Windows issue, then you can get Solution for that in Microsoft in this link:
https://support.microsoft.com/en-us/kb/896861

In quick, you can see (not recommended but I tried):

Run this power shell command
New-ItemProperty HKLM:\System\CurrentControlSet\Control\Lsa -Name "DisableLoopbackCheck" -value "1" -PropertyType dword

You can also navigate to HKEY_LOCAL_MACHINE\SYSTEM\CurrentControlSet\Control\Lsa in registry and create the dword32 for DisableLoopbackCheck, modify the value to 1.

Thank you.
will update more...

Tuesday, January 19, 2016

Change host-named for site collection in SharePoint 2013

Today I'm facing with problem to change host-named of existing site collection to another. It takes me a lot of search with some issues in each steps. So I think that will be useful if I summarize something here to save my time in future and your time also.

In short, what I do exactly is:
 - Create new site collection with new domain
 - Deploy the website on it
 - Backup old site collection, then Restore on the new site collection

Before the begin, lets define some addresses I will use in detail steps.
WebCollectionAddr : that's the web collection address, ex: sharepoint-123:8888
OldSiteCollectionAddr : that's the old site collection address, ex: sharepoint-123:8888/sites/mysite
NewSiteCollectionAddr : that's the new site collection address, ex: mysite.com
I will use those above sites to demonstrate in each steps, so you should change it by your own sites.
Now we go in detail each step:

1. Create IIS binding for domain: 
 - Go to IIS Manager, click on your site under 'Sites'. You can see 'Bindings...' somewhere in the right content, click on.
 - Click 'Add'to add new and follow the step to create new site binding.

2. Create new site collection
 - Use sharepoint Powershell:
New-SPSite ‘http://NewSiteCollectionAddr/’ -HostHeaderWebApplication ‘http://WebCollectionAddr’ -Name ‘My site’ -Description ‘This is my site’ -OwnerAlias ‘domain\account’ -language 1033 -Template ‘STS#0’

 - Note: domain\account that account to login and have permission to create site collection

3. Check site is created
 - Use sharepoint Powershell:
Get-SPSite 'http://NewSiteCollectionAddr/'

4. Deploy the web site
 - Deploy the web site in the new site collection

5. Backup the old site collection
 - Use sharepoint Powershell:
Backup-SPSite 'http://OldSiteCollectionAddr/' -Path 'D:\SPBackup\bk_name.bak'

6. Delete old site collection
 - Go to sharepoint Central Administration > Application Management > Delete a Site collection
 - Select the old site collection then delete it

7. Remove the old site collection from recycle bin
 - After deleted, the site collection go to recycle bin, to restore data to new site collection, you should completely delete old site collection
 - To do that, you should get site id of old site collection from database 'AllSites' table
 - Use sharepoint Powershell:
Remove-SPDeletedSite -Identity 'GUID_SITE_ID'
 - Note: GUID_SITE_ID will be changed by site id, usually is guid text

8. Run Gradual Site Deletion Timer Job
 - Go to Central Administration > Monitoring > Review Job Definations.
 - Click on job name: Gradual Site Delete. Click on Run now.

9. Restore to new site
 - Use sharepoint Powershell:
Restore-SPSite 'http://NewSiteCollectionAddr/' -Path 'D:\SPBackup\bk_name.bak' -HostHeaderWebApplication ‘http://WebCollectionAddr’ -Force

Follow those steps, if you have any futher issue please comment in this blog.

Thank you.

Saturday, April 18, 2015

Time management and discipline are the things I should always care about.

It's exactly my problem now. With a few days left I must be done a lot of studies. I have a lot of work plus study technical and have to take 2 certifications by next week. HOW the hell can I arrange time to do all these things.

That is my issue right now, but what really make me in the bad emotion is what did I do when I'm having nothing happen at all? The risk when I waste my time to do something no value at all now become a big issue.

So now, I should come back to time management and discipline problem. I should careful about what I spend time for and should thinking next some steps in future.

Here is crazy list, I wanna memory it here;
1. Pluralsight: Building HTML5 and JS apps with MVVM and knockout JS
2. Knockout JS
3.Durandal JS
4 UT for JS: qunit
5. LESS CSS
6. Sencha Tough JS
7. Get 2 Microsoft Certifications: 70-483, 70-484
8. Wordpress